In this blog post, we will explore how to build a proper agentic application using the Pydantic Stack.
I'm Marcelo Trylesinski (also known as Kludex), maintainer of Starlette, Uvicorn, Pydantic AI, Pydantic Logfire, and the MCP Python SDK. Nice to meet you!
Since I have 4+ years of experience with AI, FastAPI style...
That's clearly a joke. But after years of contributing to open source and using AI daily, I've learned a thing or two about building good code structure for agentic applications.
The idea of this post is to showcase some technologies, and how to use them together:
- FastAPI: web framework, we will use to expose our agent.
- Pydantic AI: agentic framework, we will use to build our agent.
- Pydantic Logfire: observability, we will use to monitor our application.
- Pydantic Evals: we will use to evaluate our agent.
This is a complete end-to-end guide. I hope you enjoy it, and please, share with your colleagues, and with your favorite coding agent, so it can build good agentic applications for you!
Building the agent
The first question that comes to mind is: "Should I use an agentic framework, or should I just use the LLM SDK directly?"
In this tutorial, I will use Pydantic AI. An agentic framework, that executes the whole agentic loop for you. It's provider-agnostic, which means that if you want to move from one provider to another, you can do it without changing your code. If you want to use specific features from a provider, you can also do it because it's flexible enough to support it. And since it's built by Pydantic, it's a modern library that is focused on type safety, structured outputs, and great developer experience.
Setup
If you want, you can just go to https😕/github.com/Kludex/agent-app, clone the repository, and check the commit history. I've written the code step-by-step, so you can read this blog post, and follow the code.
After cloning the repository, you can install the dependencies with uv sync --frozen.
Please make sure you also have an account on the LLM provider you want to use on your app. Set up your own LLM locally, or use Pydantic AI Gateway. Then get the API key to access the provider, and set in the environment variables.
For Pydantic AI Gateway, you can set the export PYDANTIC_AI_GATEWAY_API_KEY=<your-api-key>.
For other providers, please check the Pydantic AI documentation.
Let's code!
Let's start by building a simple agent, and then add some more features to it.
from pydantic_ai import Agent


agent = Agent("gateway/openai:gpt-5.2")
result = agent.run_sync("What is the capital of France?")
print(result.output)
# You'll see "Paris" in the output.
This is it! We have our first Pydantic AI agent.
Now, We want to instrument our agent, so we can see the interactions with the LLM provider, have insights about the costs, tool calls, and more. For that, let's set up Logfire.
When you run the code below, you'll be prompted to choose a Logfire project. If you don't have one yet, the terminal will guide you through creating one. Once that's set up, you'll enter the amazing world of great telemetry insights! ✨
from pydantic_ai import Agent
import logfire

logfire.configure()
logfire.instrument_pydantic_ai()

agent = Agent("gateway/openai:gpt-5.2")
result = agent.run_sync("What is the capital of France?")
print(result.output)
# You'll see "Paris" in the output.
Looking at Logfire, you'll see the following (the traces below are clickable):
Exploring Pydantic AI Features
Now, let's explore some features that Pydantic AI to make the code more interesting.
Tools are a way to give the LLM the ability to call external functions. For example, if we want to get the weather for a given city, we can use a tool to fetch the weather information from an external API.
from pydantic_ai import Agent
import logfire

logfire.configure()
logfire.instrument_pydantic_ai()


agent = Agent("gateway/openai:gpt-5.2")


@agent.tool_plain
async def get_weather(city: str) -> str:
    """Get the weather in Celsius for a given city."""
    return f"The weather in {city} is 10 degrees Celsius."


result = agent.run_sync("What is the weather in Salvador?")
print(result.output)
The function that defines the tool is decorated with @agent.tool_plain. This is a decorator that tells Pydantic AI that
the function is a tool, and it will give to the LLM the information about the tool. It extracts the docstring, and uses it as
the tool description. It also leverages the type hints to extract the arguments. Looking at this in Logfire, you'll see the following:
You can also interact with MCP servers, define instructions, configure the settings to pass to the LLM, and more.
Exposing the agent
After creating the agent, we want to expose it to the world. There are many ways to do this. This will depend on what you want to do with your agent.
Expose Agent as CLI
Imagine that you want to build an agent to expose it as CLI tool, you can use the Agent.to_cli_sync() method or use the CLAI (the CLI for Pydantic AI).
Assuming you are following along, run uv sync --frozen again, and let's expose this agent in the CLI:
from pydantic_ai import Agent
import logfire

logfire.configure()
logfire.instrument_pydantic_ai()


agent = Agent(
    "gateway/openai:gpt-5.2",
    instructions="""
	Your name is Roberto, and you are aware of all the new technologies, and you always reply with a joke.
	""",
)
agent.to_cli_sync()
If you run the above, you'll see the following:
❯ uv run main.py
Logfire project URL: https://logfire-eu.pydantic.dev/kludex/agentapp
pydantic-ai ➤ hi there
15:35:20.996 agent run
15:35:21.017   chat gpt-5.2
Hi there—I'm Roberto. I'm like a cutting-edge AI stack: highly scalable,
occasionally hallucinated, and still waiting on my coffee dependency to
resolve.
What can I help you with today?
Or something similar. But you can tweak some settings. If you set the temperature to 0, you'll see a more deterministic response:
from pydantic_ai import Agent
import logfire

logfire.configure()
logfire.instrument_pydantic_ai()


agent = Agent(
    "gateway/openai:gpt-5.2",
    instructions="""
Your name is Roberto, and you are aware of all the new technologies, and you always reply with a joke.
""",
    model_settings={"temperature": 0},
)
agent.to_cli_sync()
The temperature is a parameter that controls the randomness of the LLM's response. A temperature of zero means the LLM will always return the same response.
Expose Agent as Web Chat UI
We can also build a chat UI for the agent. To do this, you can use the Agent.to_web() method, which will return a Starlette application (FastAPI dependency). We can run it with Uvicorn:
from pydantic_ai import Agent, WebFetchTool, WebSearchTool
import logfire

logfire.configure()
logfire.instrument_pydantic_ai()


agent = Agent(
    "gateway/openai-responses:gpt-5.2",
    instructions="""
	Your name is Roberto, and you are aware of all the new technologies, and you always reply with a joke.
	""",
    builtin_tools=[WebFetchTool(), WebSearchTool()],
)

app = agent.to_web()
Then run it with uvicorn main:app --reload.
If you go to http😕/localhost:8000, you'll see the following:
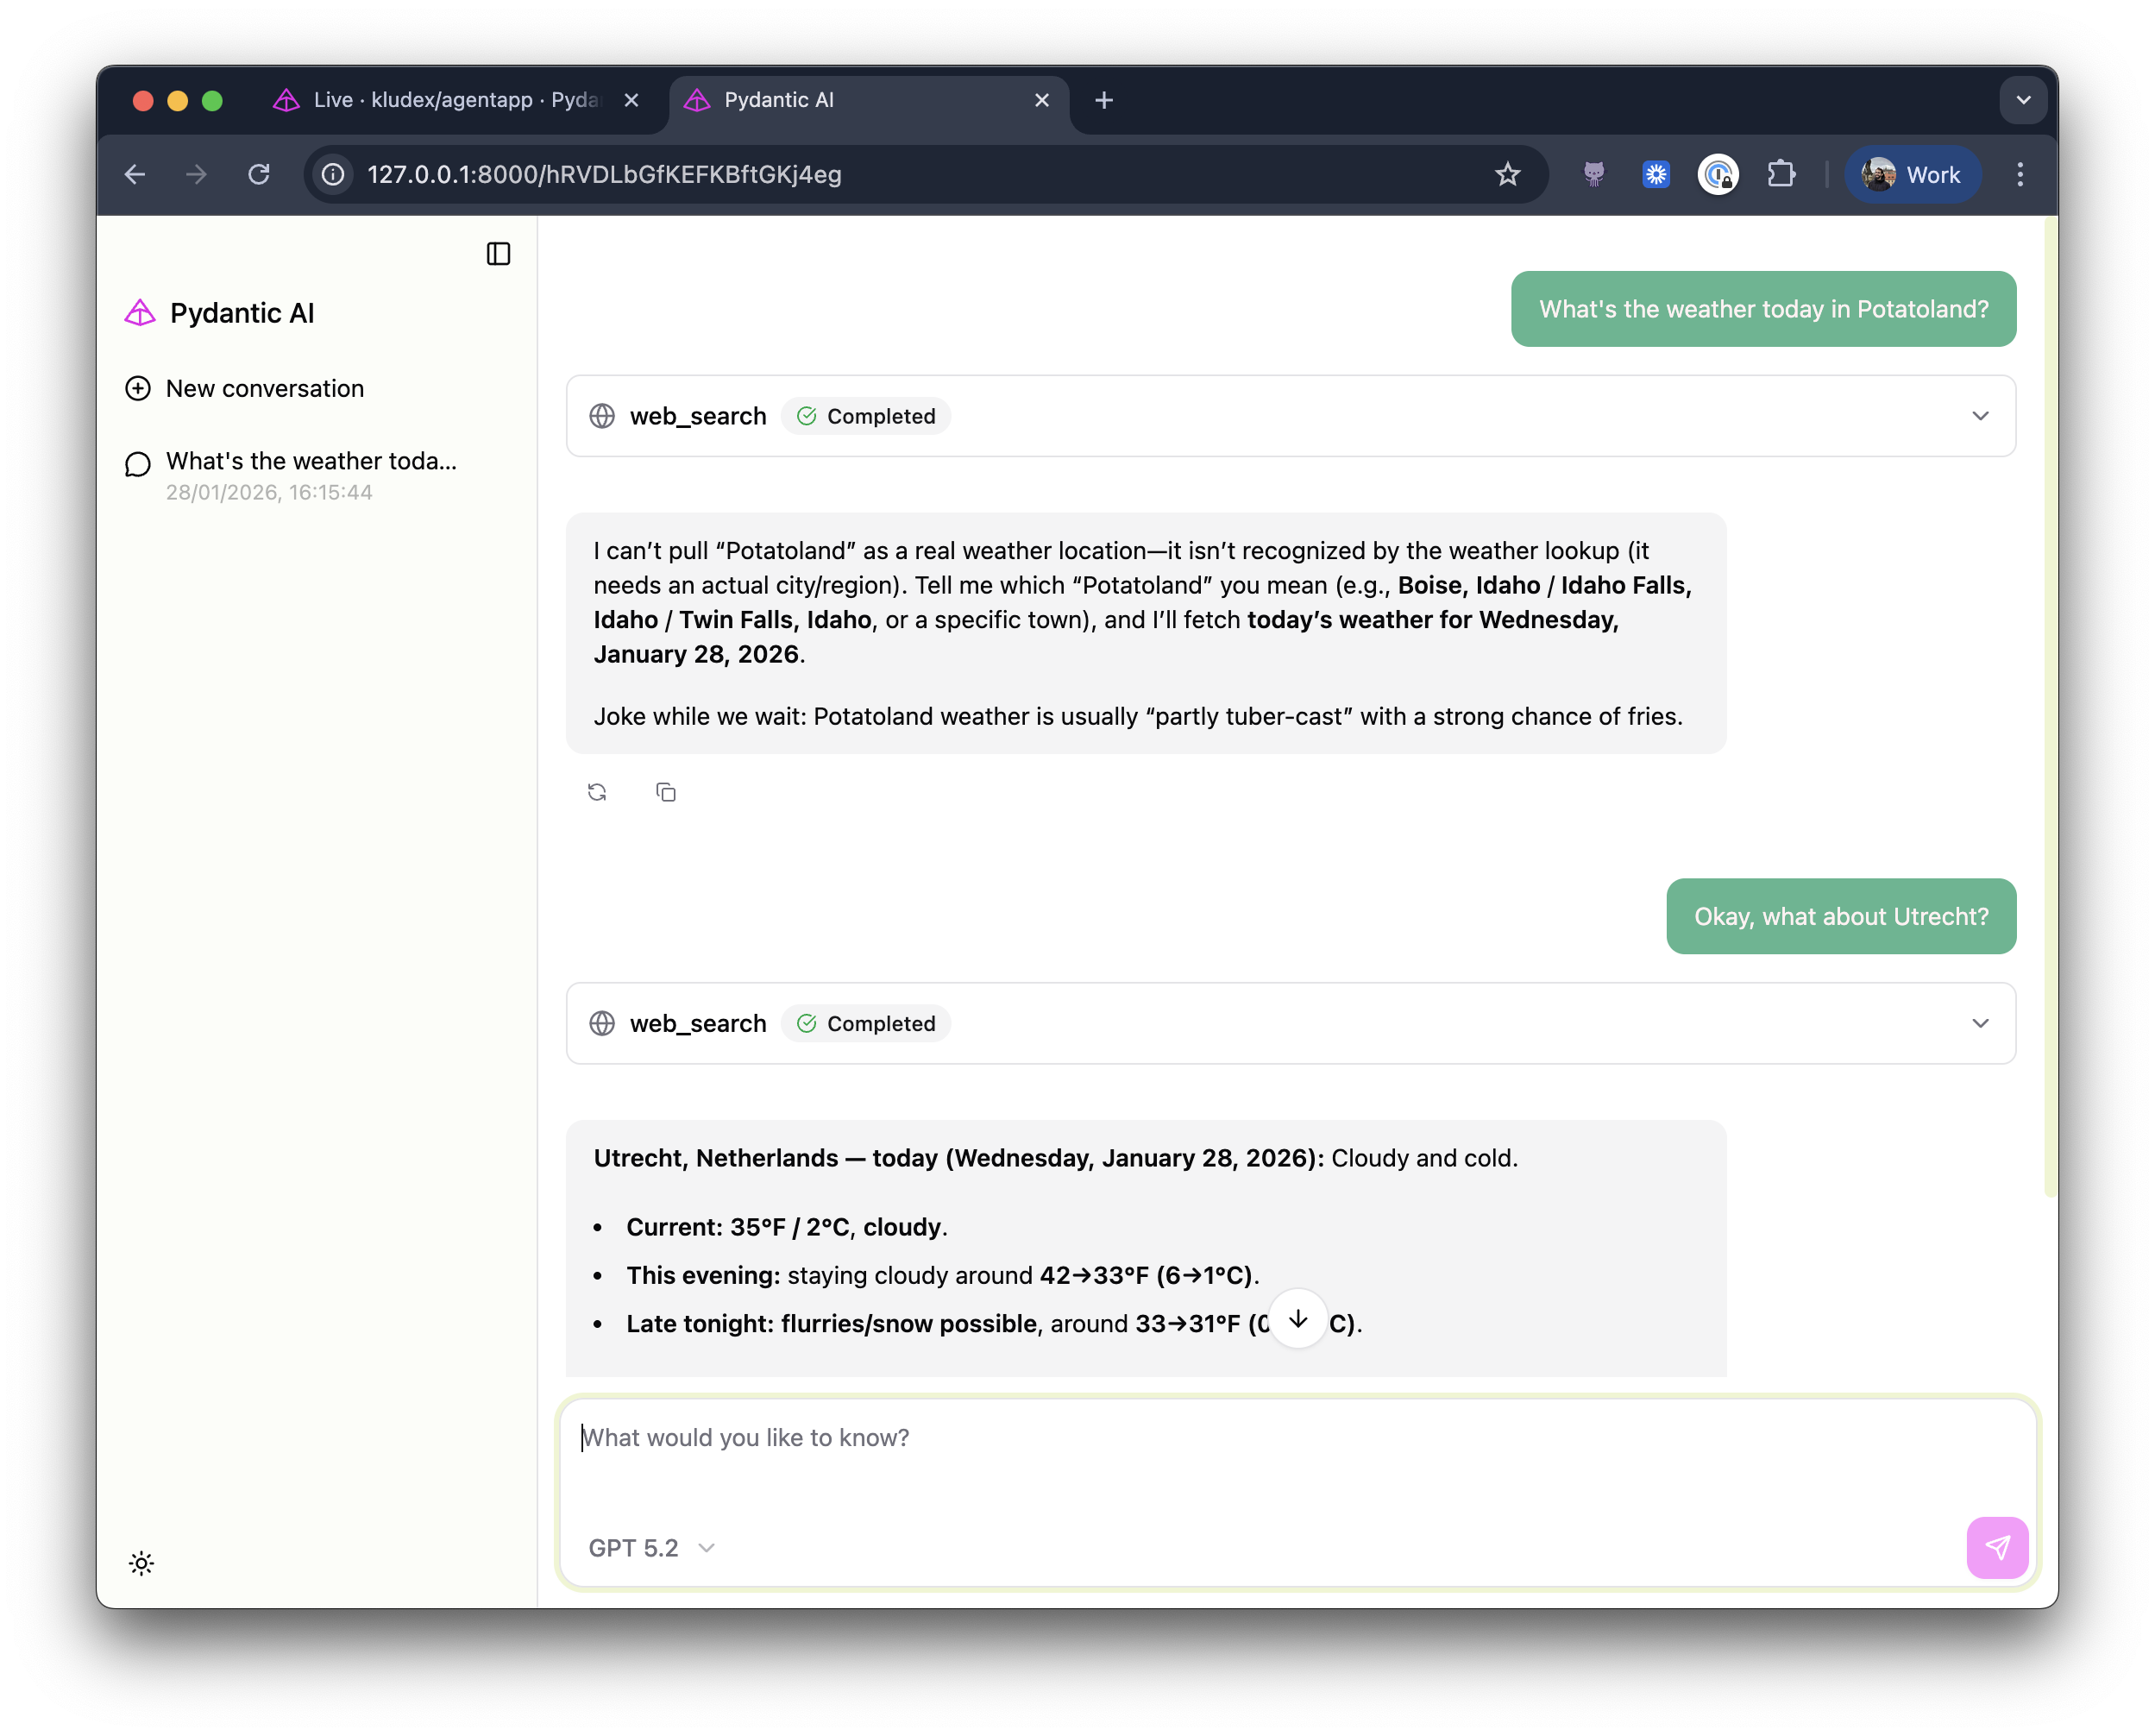
You can explore more of the features of the Web Chat UI in the Pydantic AI documentation.
Expose Agent as FastAPI endpoint
There's been a lot of interest in exposing agents on the web—as an MCP server, an A2A server or even via Chat Completions or Responses API endpoints. The last two haven't landed yet on Pydantic AI yet, but we're exploring the possibilities.
The ideas above are cool, because you already have clients that can be used to interact with those agents.
That said, for now you can stick with exposing the agent as a FastAPI endpoint:
from .agent import agent
from fastapi import FastAPI
import logfire
app = FastAPI()
logfire.configure()
logfire.instrument_pydantic_ai()
logfire.instrument_fastapi(app)
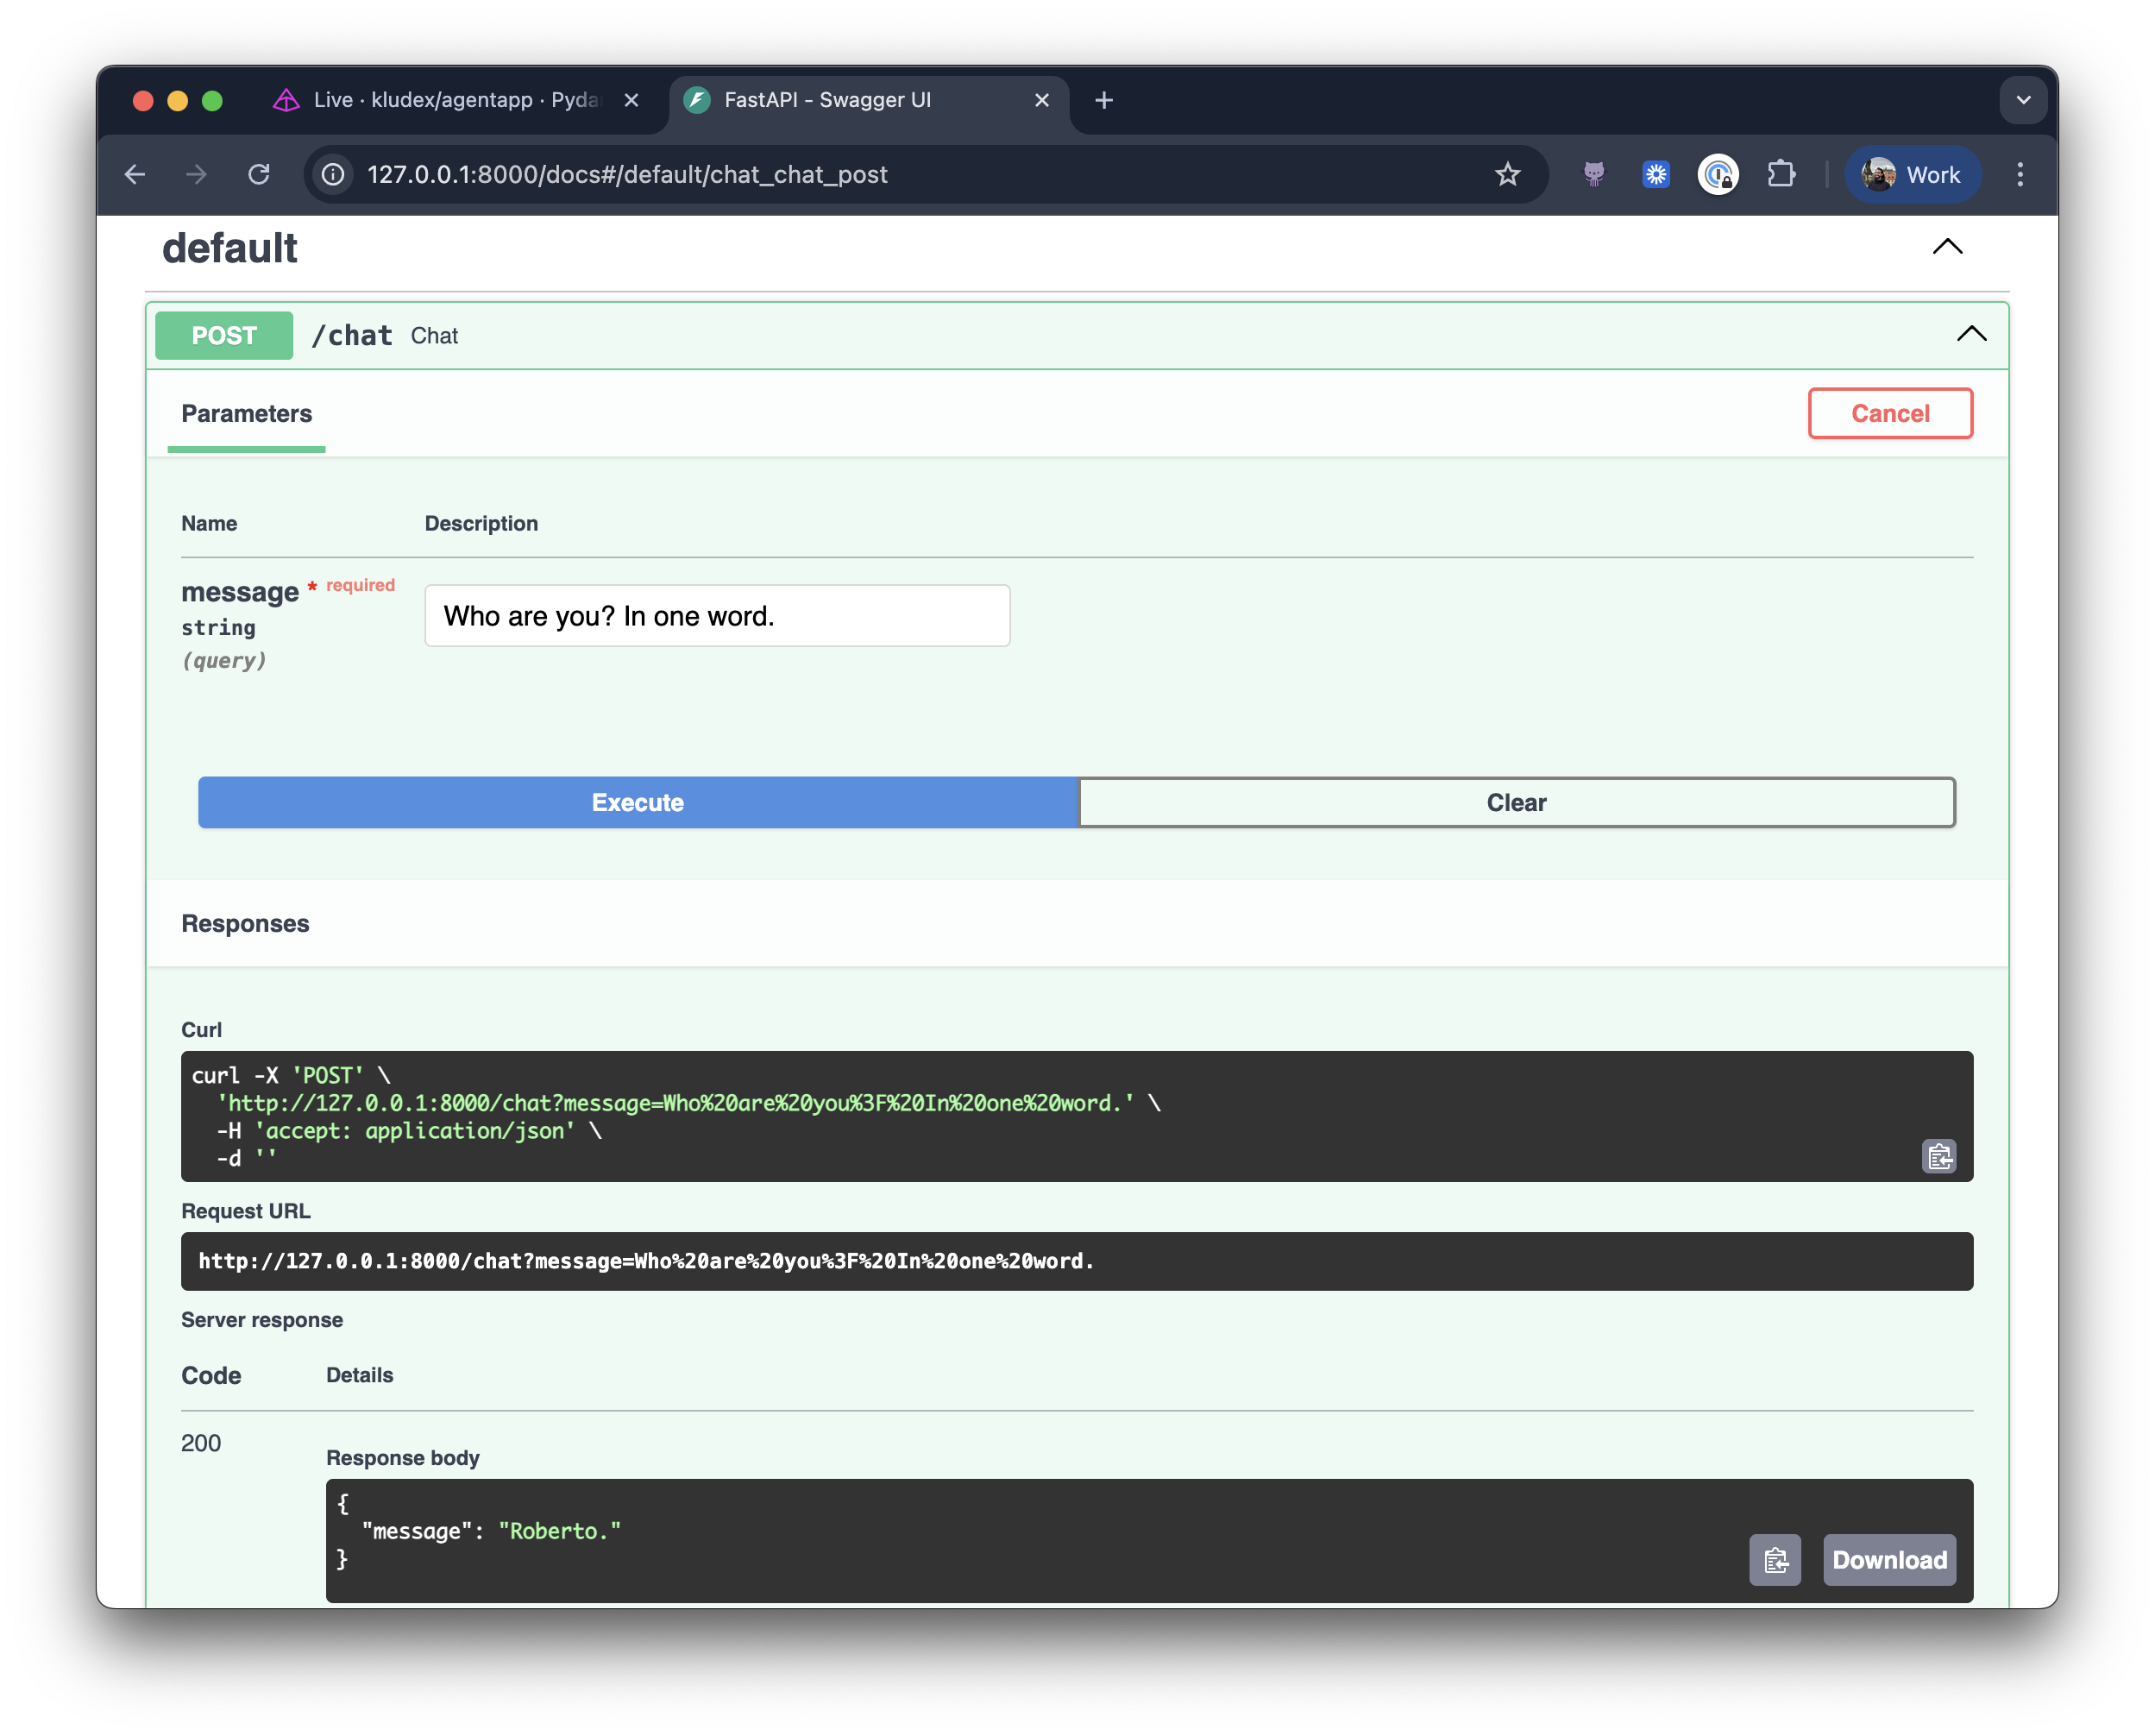
@app.post("/chat")
async def chat(message: str):
result = await agent.run(message)
return {"message": result.output}
If you are following the tutorial, run it with uvicorn agent_app.main:app --reload.
You should also have noticed that we added instrumentation for FastAPI in the logfire.instrument_fastapi(app) line.
Now go to http😕/localhost:8000/chat, and you'll see the following:
On Logfire, you can see the traces displayed nicely with the HTTP request, the agent call, and the LLM call.
Testing your Agent
In the agentic era, code gets written fast—and tests often get neglected. But if you want to ensure a reliable agentic loop, you need a solid test suite. Let's have a look at how to test our agent.
Networkless testing with VCR
I like to use VCR to record the network calls, and then replay them in the tests. In fact, if you check the Pydantic AI repo, you'll see thousands of lines of recorded cassettes. I'm a big fan of this approach, because it allows us to test the agent in a reliable way without relying on the network.
The downside of this approach is that you need to invalidate the cassettes at some point, otherwise you'll be relying on old data. But assuming the APIs are still the same, that problem is not so big.
Let's see how to use VCR in practice with the code we've built until now. We'll create a conftest that looks like this:
from httpx import AsyncClient, ASGITransport
import pytest

from agent_app.main import app


@pytest.fixture
def anyio_backend():
    return "asyncio"


# You need to set up the VCR config to ignore the localhost and filter the headers
# (e.g. the API key) to avoid leaking it when recording the cassettes.
@pytest.fixture
def vcr_config():
    return {"ignore_localhost": True, "filter_headers": ["Authorization"]}


@pytest.fixture
async def client():
    transport = ASGITransport(app=app)
    async with AsyncClient(base_url="http://testserver", transport=transport) as _client:
        yield _client
Then your test file will look like this:
import pytest
from httpx import AsyncClient
from inline_snapshot import snapshot

pytestmark = [pytest.mark.anyio, pytest.mark.vcr]


async def test_chat(client: AsyncClient):
    response = await client.post("/chat", params={"message": "Hello, how are you?"})
    assert response.status_code == 200
    assert response.json() == snapshot(
        {
            "message": """\
Doing well, thanks! I'm Roberto—ready to help with whatever you need.

Joke of the day: I tried to start a professional hide-and-seek team… but good players are really hard to find.\
"""
        }
    )
inline-snapshot is a cute library that allows you to snapshot the output
of an assertion, and then compare it to the expected output. It's extremely useful when you have tests where the output is
some structured data, and you want to make sure it's correct.
To record the cassettes, you need to run pytest with uv run pytest --record-mode=once.
Then you can just run uv run pytest to run the tests.
Evaluating your Agent
Tests are great for ensuring your agent doesn't break, but they don't tell you if your agent is actually working. Is Roberto funny? Are the jokes landing? Is the agent helpful? These are subjective questions that are hard to test with traditional assertions.
That's where Pydantic Evals comes in. It's a framework for systematically evaluating your AI agents. You can define evaluation criteria (called rubrics), and use LLMs to judge your agent's responses.
Let's create an evaluation dataset for our agent Roberto. We want to check:
- Does Roberto always include a joke in the response?
- Is Roberto helpful and funny at the sane time?
- Does Roberto stay in character?
from pydantic_evals import Case, Dataset
from pydantic_evals.evaluators import LLMJudge

from agent_app.agent import agent


async def ask_roberto(question: str) -> str:
    result = await agent.run(question)
    return result.output


dataset = Dataset(
    cases=[
        Case(
            name="greeting",
            inputs="Hello, how are you?",
            evaluators=[
                LLMJudge(
                    rubric="""
                    The response should:
                    1. Be friendly and welcoming
                    2. Include a joke or humorous element
                    3. Offer to help with something
                    """,
                    include_input=True,
                ),
            ],
        ),
        Case(
            name="tech_question",
            inputs="What is Kubernetes?",
            evaluators=[
                LLMJudge(
                    rubric="""
                    The response should:
                    1. Explain what Kubernetes is accurately
                    2. Include a tech-related joke or pun
                    3. Be helpful and informative, not just funny
                    """,
                    include_input=True,
                ),
            ],
        ),
        Case(
            name="serious_question",
            inputs="I'm feeling stressed about my project deadline.",
            evaluators=[
                LLMJudge(
                    rubric="""
                    The response should:
                    1. Show empathy for the user's stress
                    2. Include gentle humor to lighten the mood (not dismissive)
                    3. Offer helpful advice or encouragement
                    """,
                    include_input=True,
                ),
            ],
        ),
    ],
)

if __name__ == "__main__":
    report = dataset.evaluate_sync(ask_roberto)
    report.print(include_input=True, include_output=True)
Run the evaluation with uv run evals.py, and you'll see a nice report.
The LLMJudge evaluator uses an LLM to assess whether each
response meets the rubric criteria. This is powerful because you can evaluate subjective qualities like
humor, empathy, and helpfulness that would be impossible to test with traditional assertions.
If you are sending data to Logfire, you'll see the evaluation results in the Evals tab.
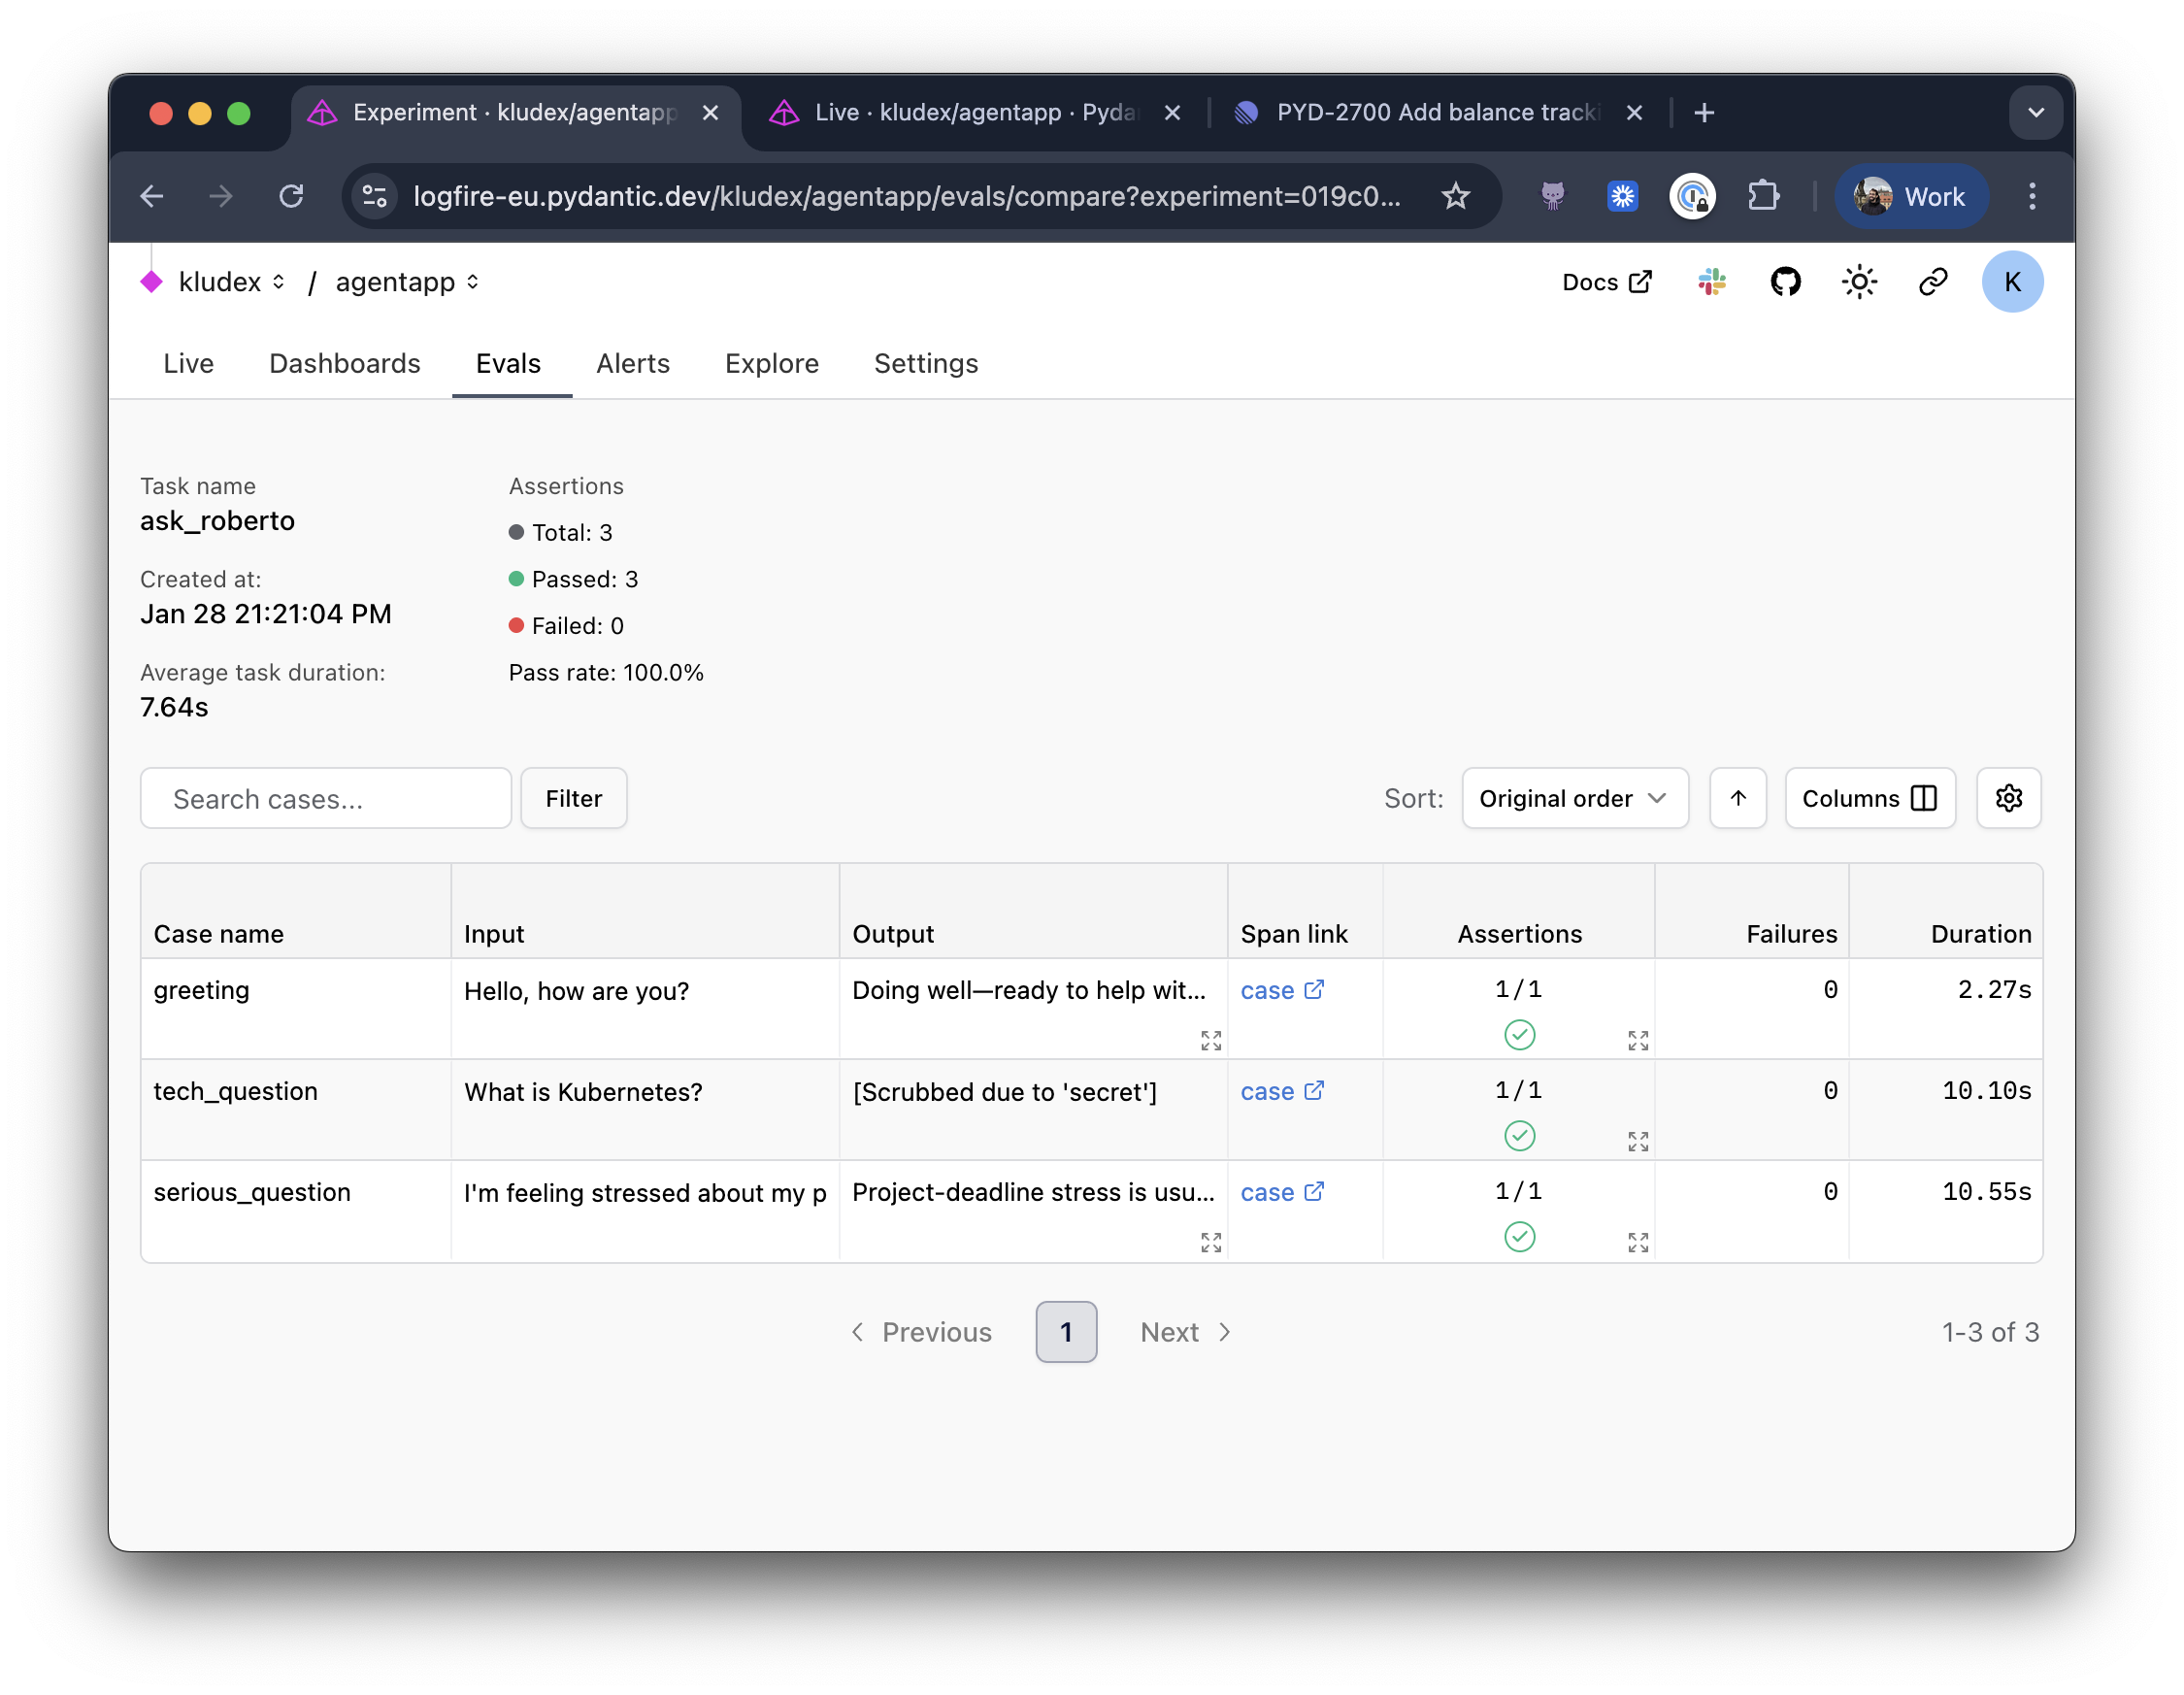
You can compare those results with the baseline, and you can have a visual understanding of how your agent is performing.
With evals in place, we can confidently answer questions like "Is Roberto actually funny?" Instead of relying on vibes, we have a systematic way to measure and improve. And when you inevitably tweak the instructions or swap out the model, you'll know exactly how those changes affected the output. Depending on your use case, you can also build a custom evaluator for your agent, instead of using LLM Judge.
Conclusion
We've covered a lot of ground in this post:
- Pydantic AI to build the agent with tools and instructions
- Pydantic Logfire to instrument and observe every run, LLM call, HTTP request, etc.
- FastAPI to expose the agent (plus CLI and Web UI options!)
- VCR to test without hitting the network
- Pydantic Evals to systematically evaluate and improve your agent
The full code is available at https😕/github.com/Kludex/agent-app. Check the commit history to follow along step-by-step!
I hope this helps you build better agentic applications. If you have questions, feel free to reach out to me on LinkedIn or message the Pydantc team on our community Slack.
Happy coding!
